Staff Users
Purpose
The main purpose of this module is to enable the administrator to manage the staff users of the portal. These users will be using the portal by having different roles in the system and information of the users will managed from the admin panel. Admin will have option to login as the user and will also be able reset the password of the user as well.
Navigation Path
Path: Users Accounts > Staff Users

Listing Screen
View list of all the Staff Users that were previously added by the Administrator. Admin will have an option to add, update, and activate/deactivate/archive user or multiple users. Admin will be able to search the users using the filter option this is provided on the listing page. Admin can view the listing in two views; admin will have the option to change the view by clicking on “Change view” Button.

List view

Grid view

- Sorting: Admin can sort the list by Name, Primary Role, Status, Added by, Added Date, Site Name, Updated By, Updated Date, Group Code.

- Text Search Filter: Admin can search from the list using the text inputs provided below.

- Filter: Admin can filter the listing using Name, status, primary role search, company search.

Actions
- Admin will have 2 action options: “Login As” as a user and “Reset Password” of a user account.

- Login As
- Admin can access the different user account.
- Admin can perform all the tasks that the user does by accessing the account.
- Admin can switch back to the Admin account as well.

- Change Password: Admin will be able to change the password of the user account.

Option to Conditional search, refresh, export and send email

Conditional Search/Filter: User will be able to search using below pop-up

- Admin will be able to search conditionally i.e. the search must satisfy the conditions “Any” or “All” based on the selection

- Multiple Field conditions can be added by clicking on “+” Button
- Field conditions can be removed by clicking on “-” Button
- Admin will have the option to select which field the input data needs to be compared and searched upon

- Criteria need to be set to compare with inputted data text input. List of Criteria are mentioned below:

- The text area will be provided to enter the data for comparison and search in the listing
Export
- Admin will have the option to export the data in excel and PDF format
- Admin can either select the columns or all the columns based on the need
- Admin can either export the current page records or all the record

Send Email: Admin need to select the the users to whom email need to be sent. On selecting the users and clicking the send email a pop-up will appear to fill the email related information.

Add New Users: To add Users, click on the “Add User” button

View Use Details
User will be provided with 3 tabs to view the details of the users
- View Summary of the user in details

- View Notes (if available)

- View the notes with the option to add notes by clicking on Add notes or Reminders button

- Add Notes: Notes can be added by adding “Remark” and uploading remark Documents

- Add Reminders: Reminder Notes can be added by adding “Remark”, Remind Date and uploading remark Documents

- Recent Activities: Option to View recent activities done by the user.

- Option to “Delete” the user account, “Reset Password” of User account, “Edit” details

Add New User Form
- Admin will be able to add the User account entry from this page
- Admin needs to fill the Account information to add the user’s account in the system.

Fields available in the Add User Account Form:
Personal Details
- Name (Required): Enter the First Name, Middle Name, and Last Name of the User in text input.
- Display Name (Required): Enter the Display Name of the User in text input.
- Email (Required): Enter the Email ID of the User in text input.
- Date of Birth: Select the date of birth from the calendar.
- Profile Image (Required): UploadProfile image of the user
- Personal Image: Upload Personal Image of the user
Primary Profile
- Company (Required): Enter the Name of the company. On entering the name of the company, suggestion box will appear which consist of name of the company.

- Company Classification (Required): The list of company classification dropdown will be dependent on the selection of the company. Admin needs to select the company classification from the dropdown list.

- Role (Required): The list of role dropdown will be dependent on the selection of the company. Select the role of the user from the dropdown list.

- Department: Enter the Name of the Department. On entering the name of the Department, the suggestion box will appear which consists of a list of the Departments.

- Site: Enter the site name of the User.
Employee Details
- Employee Code: Enter the Employee Code in the text input
- Salary Amount: Enter the Salary amount of the Employee
Contact Details
- Phone Number (Required): Select the ISD Code from the dropdown list and enter the phone number.
- Alternative Number: Select the ISD Code from the dropdown list and enter the alternative number.
- Allow Login: Yes/No – Admin can either provide access to the user in the system or not.
- Status (Required): Admin can set the status of the user as “Active” or “Inactive”.
- Remark: Admin can enter any remark in the text area.
- Account Set-up: Yes/No – If Admin selects “No”, an option will be provided to enter the password
- Password: Enter Password in the text input.
Before Submission, Admin will be redirected to “listing” page.
Admin can save the user account by submitting the form or can discard the entry.
On Submission, the user account will be listed in the listing page.
Edit Existing User Form
- Admin will be able to edit the User account entry from this page
- Admin needs to fill the Account information to edit the user’s account in the system.
- Admin will be provided 2 tabs – Edit User & User Profile
Edit User

User Profile
- Admin will be able to add multiple companies in the user profile

- Admin will be able to Add new, Delete the company, conditional search, filter text search, and reload the list.

- Admin will be able to Add new company to user profile

On submission, user will be redirected to the company listing screen for users.
User Setup Account

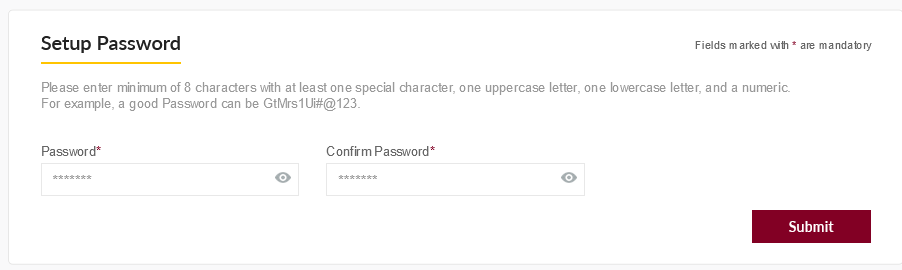
- Newly created users will initially have to configure their account by setting up password through an email received.
- A URL is shared in the email by clicking on it and the user will be asked to set a password and then they can login to the system.
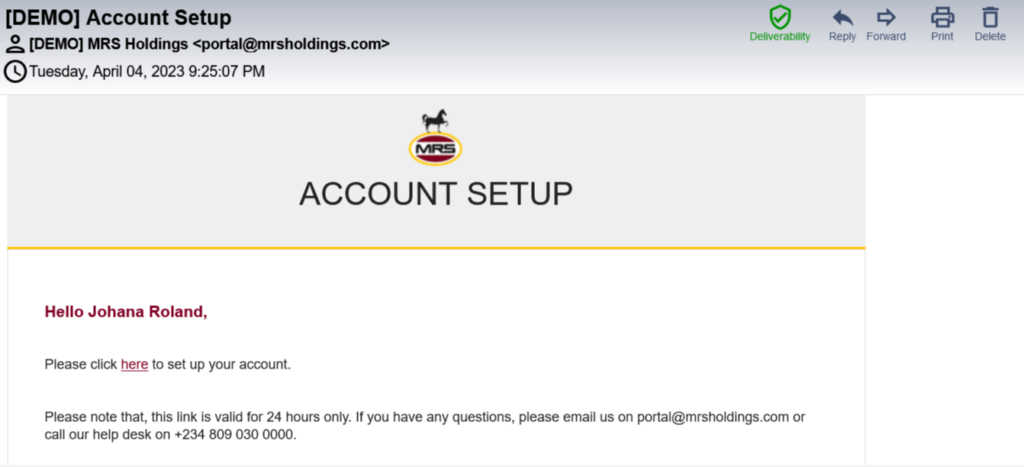
- On click of URL received in email, user will be asked to set up password and can successful login into the system.
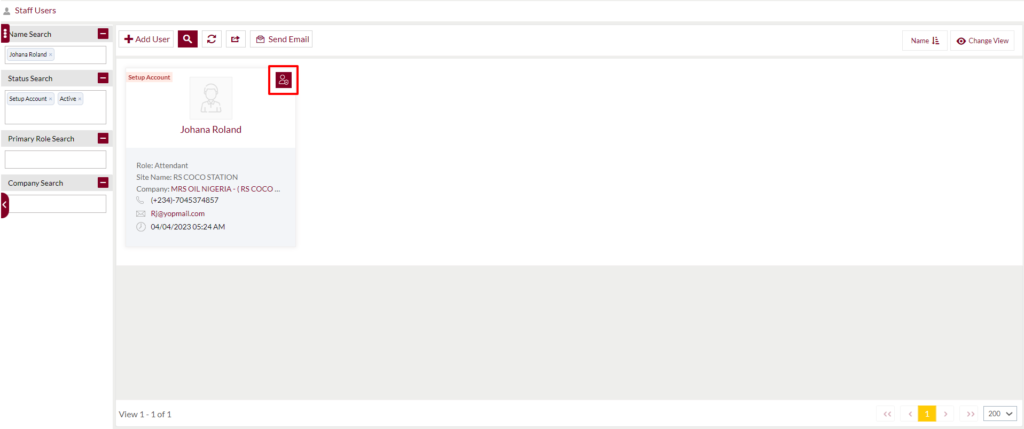
Resend Account Setup:
- If the old setup link is expired then the user can resend the account setup details on the mail.
- The resend account setup button is available in the user listing page.
- As shown in below screenshot